Adobe AI
Introduction to Adobe AI
Adobe AI is a service that Adobe provides to all of its users that integrates AI services into their platforms.
Adobe offers a range of AI features in their applications designed to enhance creativity and productivity. These include Adobe Firefly, Adobe Express, Adobe GenStudio, and Adobe Acrobat Assistant.
- Adobe Express is an all-in-one content creation application that integrates Firefly’s generative AI capabilities. It allows users to create social media posts, videos, flyers, and more with ease. Features like Generate Image and Generate Text Effect make it simple to bring creative ideas to life.
- Adobe Firefly is a generative AI tool that powers creative features in Adobe apps like Photoshop, Illustrator, and Premiere Pro. It helps users generate images, text effects, and more, using simple text prompts.
- Generative AI in Adobe Applications are generative AI services that are integrated into Adobe applications.
BYU and Adobe
Every student, staff member, and faculty member at BYU can access Adobe products by going to adobe.byu.edu and signing in with their netID.
Adobe Express is free for everyone at BYU. Adobe Creative Cloud and other Adobe Products are not free for students and can be bought at a discounted rate.
If you are a student or non-student employee, you can get access to Adobe Creative Cloud and other Adobe products by getting approval from your supervisor.
Adobe Express
Adobe Express is a service provided by Adobe that is mainly used for content creation. You can access Adobe Express by going to new.express.adobe.com and logging in with your netID@byu.edu email with your netID password.
Adobe Express utilizes Generative AI through the “Generate with AI” section. In this section, you can generate an image, remove objects in an image, insert objects in an image, generate a template, and generate text effects.
Generate an Image:
Once you click on “Generate with AI”, click on “Generate Image”. Through Generate Image, you can prompt Adobe AI to create any type of image based on a style and composition of your choice. You can also let Adobe AI start an idea for you. Prompt engineering is the process of tailoring the AI to do specifically what you want to see. Learn more about prompt engineering.
Once you generate an image you can save it or continue to refine it through further prompts or a different style or composition.
All images that are used in Adobe as a style or composition reference must be approved through BYU’s copyright policy. You can use resources like unsplash.com, pexels.com, etc. to find royalty-free images that you can base your generated image on. Further information about BYU’s copyright policy can be found at copyright.byu.edu.
Learn more about Generate Image by watching the following video:
Remove Objects
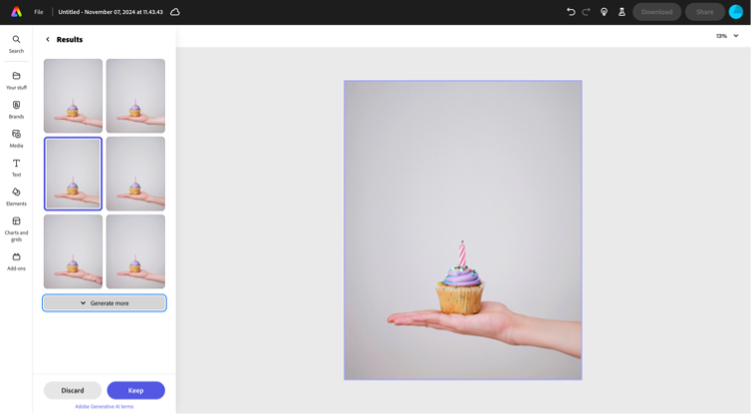
Click on “Generate with AI” and then click on “Remove Objects”. Remove Objects is a feature that allows you to add or remove objects that are currently in your pictures. Using the remove objects feature, you can highlight a specific part of an image and AI will generate a new idea based on what you choose to remove.
One thing to keep in mind while using this feature is that it will only generate a new idea for your photo using AI and depending on what you want to get rid of, you could potentially make AI hallucinate.
In the example below, there is a picture of a hand holding a cupcake and the remove object feature is used to remove a section of a person’s arm and change what it looks like. It is important to note that Adobe AI can hallucinate like every other Generative AI tool. It is also important to be specific with the areas that you highlight using this tool to avoid any type of error when you use the Remove Objects tool.

For more robust AI image editing, we suggest you use the generative fill feature in Adobe Photoshop which can be accessed through Adobe Creative Cloud and is part of BYU’s contract with Adobe.
Learn more about Remove Object by watching the following video:
Insert Object
Click on “Generate with AI” and then click on “Insert Object”. Insert Object is a tool that allows you to insert a prompt and add any object to an image. This feature utilizes prompt engineering just like Generate an Image. Learn more about prompt engineering here.
Insert Object combines aspects of Remove Object and will prompt you to highlight a section of your picture where you would like to insert an object. Similarly, to remove objects, be careful of potential hallucinations and make sure that your prompt is specific enough to get the intended outcome. Also, ensure that you are highlighting the intended area of where you would like to see the inserted object.
Below is an example of adding the Wasatch mountains to the background of the cupcake. In this case, AI was asked to keep the original picture of even though the entire section was highlighted. Make sure to highlight only the section where you would like the inserted object to be placed.


Learn more about Insert Object by watching the following video:
Generate Template
Click on “Generate with AI” and then click on “Generate Template”. Generate Template allows you to create anything, including a poster, an Instagram post, etc.
Start by selecting which template you would like to create and then, like the other Generative AI tools, insert a prompt of a template you would like to see and select the desired template. Once you click on the template, you can customize the template even further. You can also upload a specific image to be included in the generated template.
Learn more about Generate Template by watching the following video:
Generate Text Effects
Click on “Generate with AI” and then click on “Generate Text Effects”. Generate Text Effects allows you to create custom text fonts, colors, and styles. Start by inserting a prompt into the description of a type of texture you would like to see. No need to say “I want to see…” or “Give me an example of….” Simply type the texture you would like to see. For example, you can type “zebra print” and text effects will show a zebra print for your text.
You can adjust how the text effect looks by changing the style and effects on the text as well through this feature.
Learn more about Generate Text Effects by watching the following video:
Adobe Firefly
Adobe Firefly is another extension of Adobe that is available through BYU’s license with Adobe, however, only Text to Image is the only feature that is available through this license.
Text to Image works essentially like "Generate an Image" found in Adobe Express. However, Adobe Firefly’s Text to Image has more features than Generate an Image. For example, the composition and style components for Text to Image are more comprehensive and give examples of how you can edit your image. Furthermore, it gives you the ability to adjust the intensity of styles that you choose as well as pick further effects including choosing a color palette for your image, adjusting the lighting, as well as changing the camera angle for the image.
Learn more about Adobe Firefly’s Text to Image by watching the following video:
Generative AI in Adobe Applications
Adobe Firefly is integrated into Adobe applications and can be accessed by logging into Adobe Creative Cloud. Again, Adobe Creative Cloud is a paid service for all students that are not employed by BYU. In this example, we will be going over how Adobe Photoshop works with Adobe AI.
You can download Adobe Photoshop by going to Adobe Creative Cloud, logging into your student account, clicking on apps, and downloading Adobe Photoshop.
Adobe Photoshop allows you to remove objects in a photo that you upload, insert objects into a photo, and edit photos as well. Overall, it is an all-encompassing app for photo editing.
One of of the main Generative AI features found in Adobe Photoshop is to add a Generative AI layer into your image by selecting a portion of your image and inserting a prompt into the “Generative Fill” section.
One of the main advantages of using Adobe Photoshop, as opposed to any of the other Generative AI services through Adobe, is the use of layers. You can delete previous layers you’ve created and go back to the original image as well.
Learn more about Adobe Photoshop by watching the following video:
Continued Efforts from Adobe
Adobe is constantly updating their Generative AI features on each of their services.
For any questions or clarifications regarding Adobe AI and BYU, please reach out to AI-Committee@byu.edu.